Hey, guys! First of all I want to say a massive I’M SORRY because I said a few weeks ago that I was going to be posting more often, and that didn’t happen
In reality, I’ve had the photos for this for about 2.5 weeks but I was nervous to put it up, and I’m not sure why
Just want to put it out there, though – my brows look terrible. They were in serious need of a wax but I just didn’t have the time
Anyway, I hope you guys enjoy my first tutorial-type post!
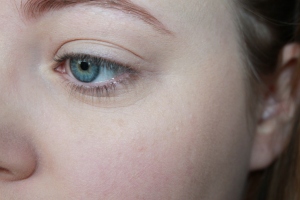
Step one: Apply the primer of your choice, whatever works for you will be fine. I used Too Faced Shadow Insurance

Step Two: Next, you want to put a really neutral, matte colour through your crease. Something that’s slightly darker than your natural skintone
For this I used Makeup Geek’s Creme Brulee eyeshadow

Step Three: Using a fluffy blending brush (something similar to Sigma’s E30 or E40), put through a slightly darker brown into your crease and blend above
I used Latte by Makeup Geek for this
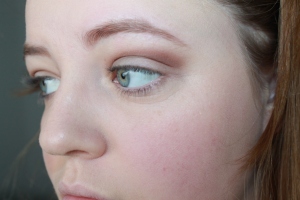
Step Four: Add an even darker brown, continuing to blend where you just put Latte by
For this, I used Mocha by Makeup Geek
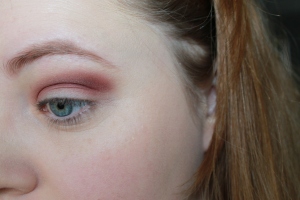
Step Five: Now we’re adding the warmth! You want to use a really warm, deep burgundy shade. Adding little bits at a time, blend this through your crease, using something slightly more precise than the E40 (What we used earlier) – I used the Sigma E45 to place the colour where I wanted it and then used the Makeup Geek Soft Dome Brush to diffuse the colour
I used Bitten by Makeup Geek
Make sure you’re bringing your warm shadows into the inner corner a bit – not too much, but enough so that it looks blended and diffused
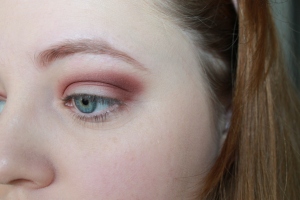
Step Six: Next, I went back into both Mocha and Bitten with my E45 brush and connected the end of my shadow to the corner of my eye, to give a nicer shaper to the shadows and my eyes. I did this mostly because I wasn’t going to be adding any eyeliner, so this is how I decided to add some more dimension
As you can see, there’s a blank space in the centre of my lid, so next we’ll be filling it in
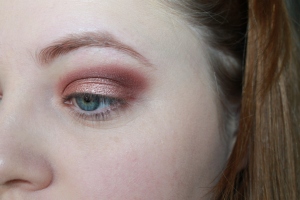
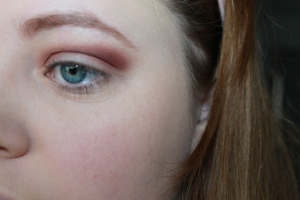
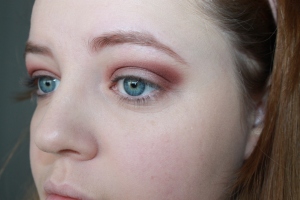
Step Seven: Taking any sort of flat shader brush, or your finger, take Grandstand by Makeup Geek (This is a foiled eyeshadow) and softly pat it onto the centre of your lid. Next, take a brush and slowly and carefully blend out the edges of Grandstand so that it doesn’t look too harsh on the lid
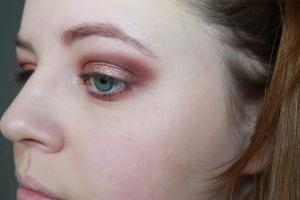
Step Eight: Taking a Flat Definer Brush (Sigma E15 is what I used), mix the colours Bitten and Mocha together and bring both colours underneath your lower lash line and blend out softly with a clean pencil brush
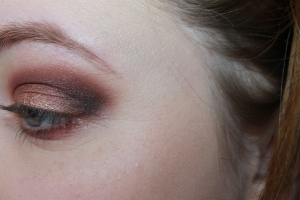
Step Nine: Just to add some more dimension, I then took a tiny amount of Corrupt by Makeup Geek and blended it through the outer ‘V’ of my eye and slightly through my crease


Step 10: Add a couple of coats of your favourite mascara (Mine is Jordana’s Best Lash Extreme) and you’re done!
I hope you guys enjoyed this and it helped some of you out!
As usual, all products were purchased by me, with my own money
Pictures photographed using Canon EOS 1100D Camera in natural lightning
Thanks for reading!
Much love, Caitlin xo

I love this look with your eye colour (which is incredible by the way!) great post! X
LikeLike
Thank you so much!
LikeLike
Great post 😉
And i love your blog 🙂
You should check out mine as well, i think you would like it : https://mymakeuptipps.wordpress.com/
LikeLike
I’ll check it out 🙂
LikeLiked by 1 person
In love with the eye look! It is so beautiful and flawless ❤
LikeLike
Thank you so much ♡
LikeLike
In love!!
LikeLike
Obsessed!! Love the color, girl. 🙂 xo
LikeLike
Thank you 🙂
LikeLike